Introduction
Ever wondered about those tiny holes or notches along the edge of a printed circuit board (PCB) and what purpose they serve? They’re not just random marks—they’re mouse bites in PCB, a clever feature that makes manufacturing smoother and more efficient. In the intricate world of electronics, where precision and cost often clash, mouse bites offer a simple solution to a common challenge: separating individual PCBs from a larger panel. But what exactly are they, and why do they matter? In this complete guide, we’ll unpack the definition of mouse bites, how they work, their pros and cons, and how they compare to alternatives like V-scoring. Whether you’re prototyping your next big idea or managing a production run, understanding mouse bites could be the key to smarter PCB design. Let’s take a closer look.
What Are Mouse Bites in PCB?
Mouse bites in PCB refer to small perforations or cutouts strategically placed along the edges of a PCB panel. Their job? To make it easy to break apart individual boards after they’ve been manufactured together as a single unit. Picture a sheet of perforated stamps—snap along the dotted line, and you’ve got your piece. That’s the essence of mouse bites, often called perforated breakaway tabs in technical circles.

The name “mouse bites” comes from their appearance: a series of tiny, nibble-like holes that weaken the material just enough for a clean split. Their primary purpose is depanelization—the process of separating multiple PCBs fabricated on a single panel. Panels are used to streamline production, save costs, and handle small components efficiently. Mouse bites ensure that once the soldering and testing are done, you can pop out each board without fancy tools or excessive force.
Simple yet effective, mouse bites are a staple in PCB manufacturing. But how do they go from design to reality? Let’s explore the process.
How Mouse Bites Work in PCB
Mouse bites are all about practicality—here’s how they’re designed and used:
Design Process
Mouse bites start in the PCB design phase, typically using CAD software like Altium or KiCad. The designer adds a row of small holes or partial cuts along the edges where boards will separate:
- Hole Size: Commonly 0.5mm to 1mm in diameter—small enough to maintain strength, big enough to enable breaking.
- Spacing: Holes are spaced roughly 0.76mm to 1mm apart, tailored to the board’s thickness and material.
- Placement: Usually grouped in clusters (e.g., 5–7 holes per tab) along a breakaway section.
These perforations are then drilled or routed into the panel using CNC machines during fabrication, leaving just enough material to hold everything together through production.
Separation
Once the panel is fully assembled—components soldered, circuits tested—it’s time to depanelize:
- Manual Break: For standard boards (e.g., 1.6mm FR4), a quick twist or bend snaps them apart cleanly.
- Tool-Assisted: Thicker or delicate boards might need pliers or a gentle press to avoid stressing the material.
The result is a set of individual PCBs, ready for use with minimal cleanup.
Specifications
Mouse bites are customizable, but typical designs keep things standard for cost efficiency. A common setup might feature 6 holes spaced 0.8mm apart across a 10mm tab. At TriWin PCB, we tweak these specs to suit your project, ensuring reliable separation without compromising board integrity.
Mouse bites are a small detail with a big impact—but are they always the right choice? Let’s weigh the pros and cons.
Advantages and Disadvantages of Mouse Bites in PCB
Mouse bites are a practical tool, but they’re not perfect for every scenario. Here’s a balanced look at their strengths and weaknesses:
Advantages
- Cost-Effective: No need for pricey cutting machines or extra processing—mouse bites keep small runs and prototypes affordable.
- Simple Separation: Hand-breakable tabs make depanelization quick and accessible, no special skills required.
- Versatile Shapes: They work well with irregular or curved board outlines, where straight-cut methods struggle.
- Low Setup Overhead: Adding perforations is a fast, straightforward step in design and production.
Disadvantages
- Rough Edges: Snapping leaves jagged or uneven edges that might need sanding for a smooth finish—less ideal for visible boards.
- Limited Durability: Too many holes or thin material can weaken the panel, risking breaks during handling or shipping.
- Not for Precision Needs: Thick boards (e.g., 2mm+) or high-tolerance designs may crack under stress, needing cleaner methods.
- Aesthetic Trade-Off: Visible tabs can clash with a sleek design if the PCB isn’t hidden in the final product.
Mouse bites are a budget-friendly, flexible option, but their quirks mean they’re not universal. How do they compare to other depanelization tricks? Let’s find out.
Mouse Bites vs. Other PCB Depanelization Methods
Mouse bites aren’t the only way to split a PCB panel—here’s how they stack up against the competition:
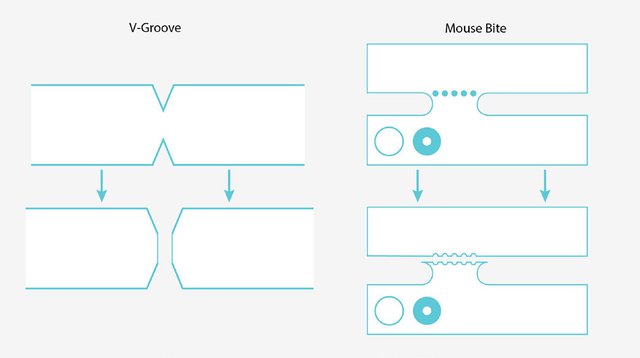
V-Scoring
- What It Is: V-shaped grooves cut into the panel’s top and bottom, leaving a thin strip to break apart.
- Pros: Cleaner, straighter edges with less post-processing; great for mass production.
- Cons: Higher cost due to precision cutting; limited to straight lines, not curves.
- Vs. Mouse Bites: V-scoring offers a polished finish but costs more; mouse bites win for flexibility and savings.
Routing (Tab Routing)
- What It Is: Full milling around each board, leaving small tabs (sometimes with mouse bites) to hold the panel together.
- Pros: Smooth, precise edges, perfect for thick or high-quality boards.
- Cons: More expensive and time-consuming due to extensive machining.
- Vs. Mouse Bites: Routing delivers top-tier results at a premium; mouse bites keep it simple and cheap.
Decision Guide
- Choose Mouse Bites: For prototypes, small batches, or odd shapes where cost and ease beat aesthetics.
- Opt for V-Scoring: When you need clean, straight cuts for high-volume or polished products.
- Go with Routing: For thick boards or premium finishes where precision trumps budget.
At TriWin PCB, we’ve mastered all three methods. Our team can help you pick the perfect approach—mouse bites or otherwise—based on your project’s needs.
Applications of Mouse Bites in PCB
Mouse bites might be small, but they’re mighty in the right context. Here’s where they shine:
Use Cases
- Prototypes: Fast, affordable separation for testing designs before scaling up.
- Small-Batch Production: Ideal for 10–100 units, keeping costs low without complex setups.
- Irregular Shapes: Perfect for circular or custom boards that defy straight-line methods.
Industries
- Consumer Electronics: Used in wearables or IoT gadgets where budget trumps edge finish.
- LED Panels: Helps break apart arrays of lighting boards efficiently.
- Automotive Components: Prototypes for sensors or control units often lean on mouse bites for quick iteration.
Practical Examples
Imagine a startup designing a quirky, star-shaped PCB for a novelty gadget. Mouse bites along the edges let them produce a small run cheaply, snapping apart boards by hand for testing. Or consider an LED strip project—mouse bites make it easy to separate segments without investing in costly routing.
With a 10,000-square-meter facility and advanced tools like LDI exposure machines, TriWin PCB nails mouse bite precision every time. Our 25万平方米 annual capacity means we’re ready to scale with you, from one-off designs to full production.
Conclusion
Mouse bites in PCB might not grab headlines, but they’re a quiet workhorse in electronics manufacturing. These tiny perforations simplify depanelization, offering a cost-effective, versatile way to break apart panels into usable boards. They’re not flawless—rough edges and limited precision keep them in check—but for prototypes, small runs, and odd shapes, they’re tough to beat. Compared to V-scoring or routing, mouse bites strike a balance between affordability and function that’s hard to ignore.
Next time you’re sketching out a PCB, think about mouse bites for their practicality. Need help deciding? TriWin PCB has the expertise to guide you. With years of experience and a knack for precision, we’ll ensure your boards—mouse bites or not—come out just right. Contact us today—let’s make your next project a snap.
FAQs
Q: Do mouse bites affect PCB quality?
A: Not if done right. Well-designed perforations won’t harm functionality, though rough edges might need smoothing for aesthetics.
Q: Are mouse bites cheaper than V-scoring?
A: Yes, they avoid the precision cutting of V-scoring, saving money on small or irregular projects.
Q: Can I use mouse bites on thick PCBs?
A: It’s tricky—boards over 2mm may crack or resist clean breaks. Routing’s often better for thicker materials.
Q: How do I add mouse bites to my PCB design?
A: Use PCB software to place perforations along breakaway edges; your manufacturer can refine the layout.
Q: When should I avoid mouse bites?
A: Skip them for high-precision boards, thick substrates, or products where edge finish is critical.